Shell Game, Part One
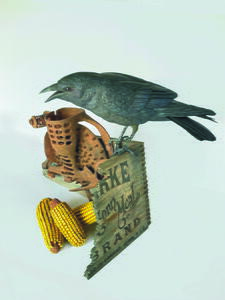
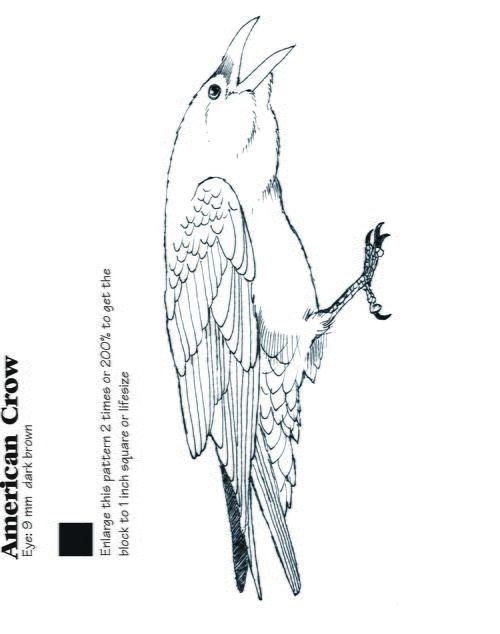
This cornfield crow is pure Americana.

By the time 2020 was just getting into the second quarter, we were all told to shelter in place and not venture out in public unless absolutely necessary. The pandemic had imposed itself on our way of life. Not only did we isolate ourselves, but we also witnessed the cancellation of all our art shows, competitions, and public gallery presentations. The back-handed silver lining of the pandemic is that forced artists to cocoon in their studios and workspaces and create. With no shows in the near future, I remember wondering just what kind of bird and narrative presentation I would work on.
I had completed an American crow about four years earlier, and although the carving came out fine, I was not happy with the painting. It was soft but dull. The subtle iridescent quality of the crow was completely lacking. I learned over the years that how you texture your carving has a huge effect on how it will look when painted. Since it looked like we were going to be isolated for a while, I decided that I had the time to experiment with another crow.
American Crow, Part One: Carving
-
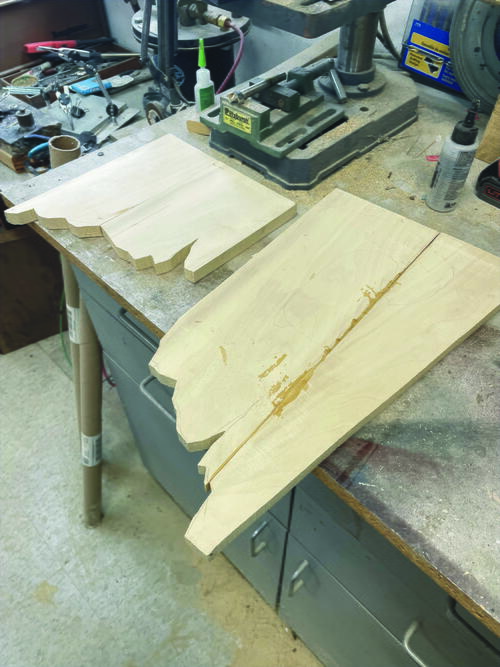
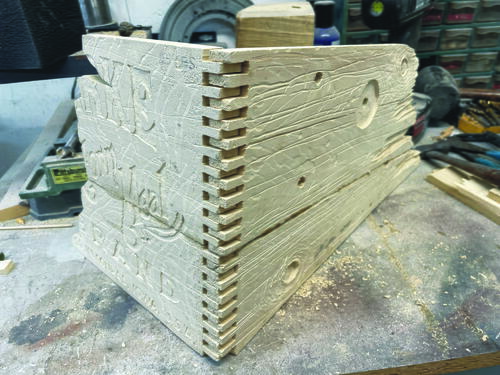
I started with the idea of the crow resting on an old broken box, complete with breaks, splinters, and cracks. I milled some tupelo down and glued my box pieces and cut out the broken-looking edges.
-
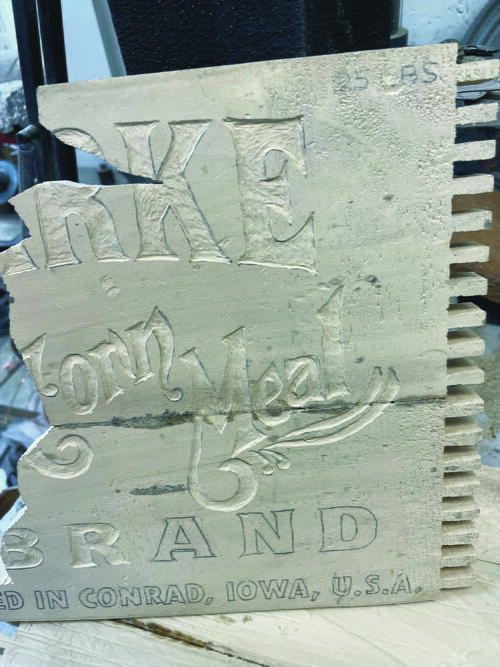
Looking at the pieces for the box, I decided on the dovetail method of connection. I stumbled upon some interesting pictures online of vintage agricultural crates and decided to add some lettering, too.
-
This lettering didn’t look just printed on but also impressed or stamped into the surface. It was apparent that I would have to carve the lettering as well as paint it.
-
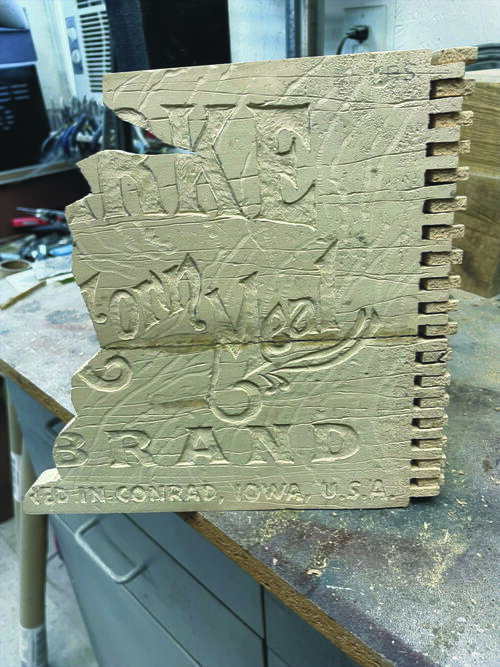
I ended up carving or hand-free routing the letters with a flat-end diamond. Keeping my depth at 2mm, I used the same diamond tip to address the cracks and aging in the crate panels as well.
-
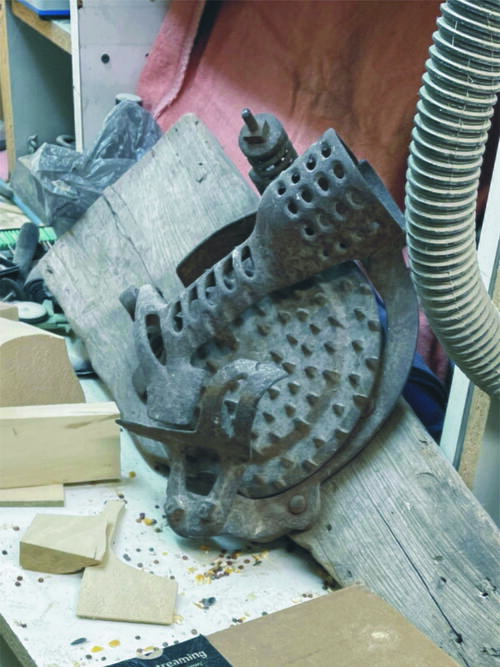
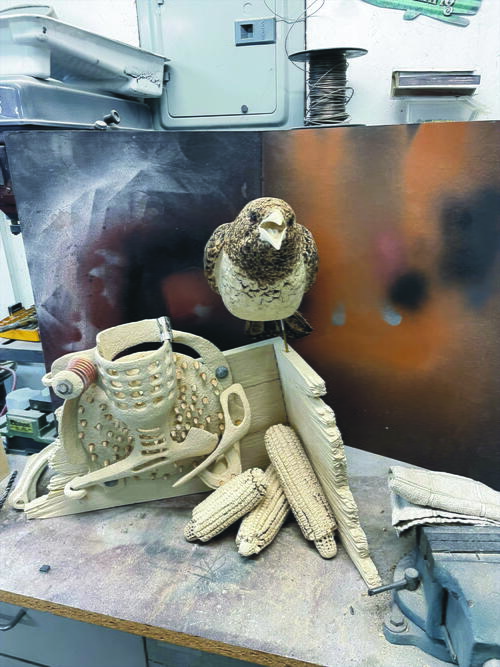
With the crate carved out in full view I decided that it needed something more. Those of you that know me know I have a penchant for working rusty things into my bird compositions. So I got on the internet again and started looking for small, rusty agricultural devices. I found what is called a “corn sheller,” a hand-cranking machine that removes the corn kernels right off the cob. Although I found many pictures and angles for this device, it was a complex enough gadget that it still left me with questions about its shape and dimensions. I found one on Ebay and ordered it to form my patterns and measurements.
-
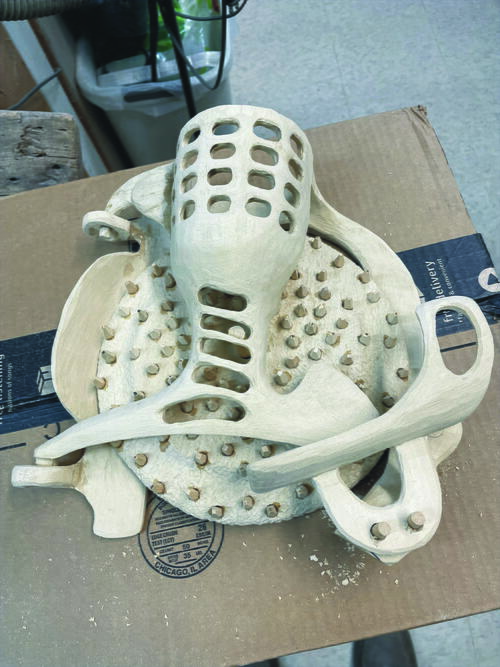
There are five separate pieces that make up this machine that I reproduced. One of the problems with the corn sheller is that the original size of the machine was a little too large for the composition. It was stealing the visual and was more noticeable than the crow would have been. Using some artistic license, I downsized my carved reproduction by 10% to have it fit the overall composition.
-
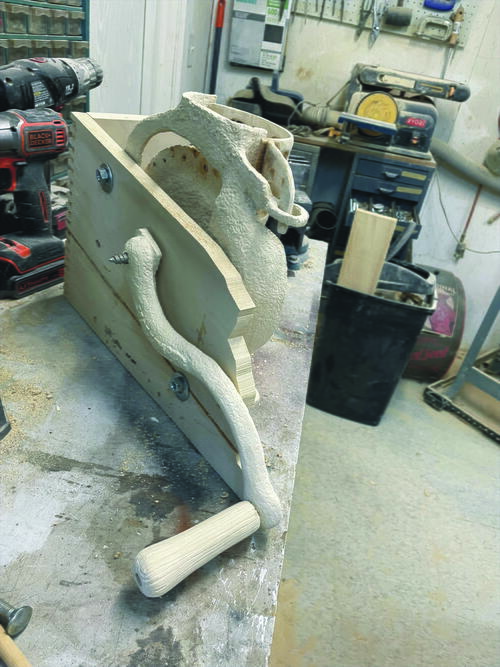
With the carved reproduction finished, I was able to measure the crate for location of the bolt holes and the hand crank.
-
The back plate of this sheller is the largest part. I will use three real bolts to hold it in place. I will not be able to permanently secure it until all the pieces are painted.
-
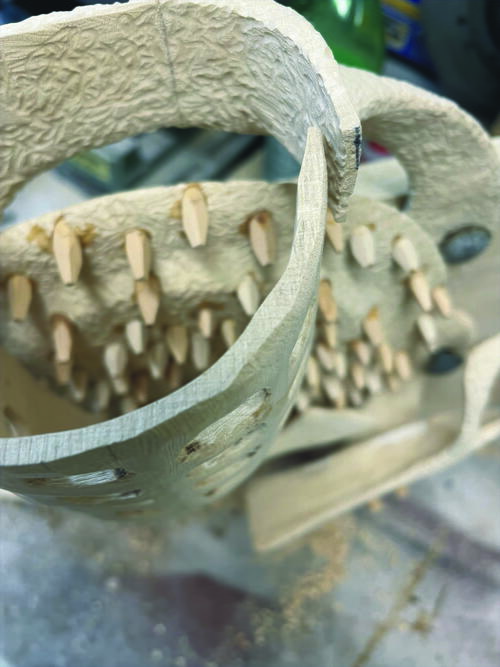
The grinding wheel is loosely secured by a wooden dowel. I also used wooden dowels to create the “teeth” of the grinding wheel.
-
The same wooden dowel that holds the grinding wheel is also the shaft for the hand crank lever, which consists of three individual pieces.
-
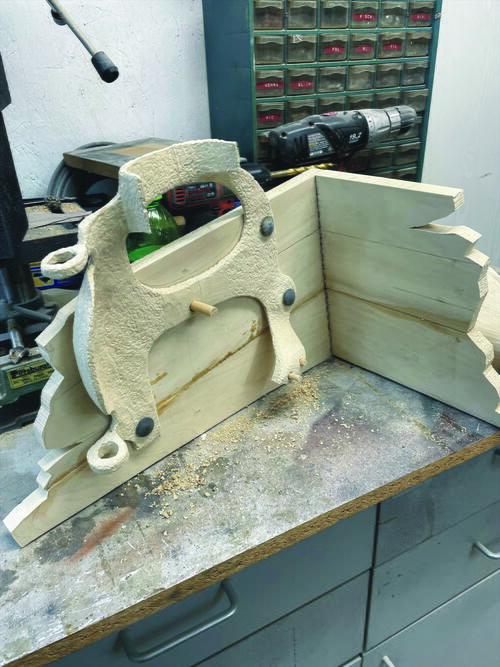
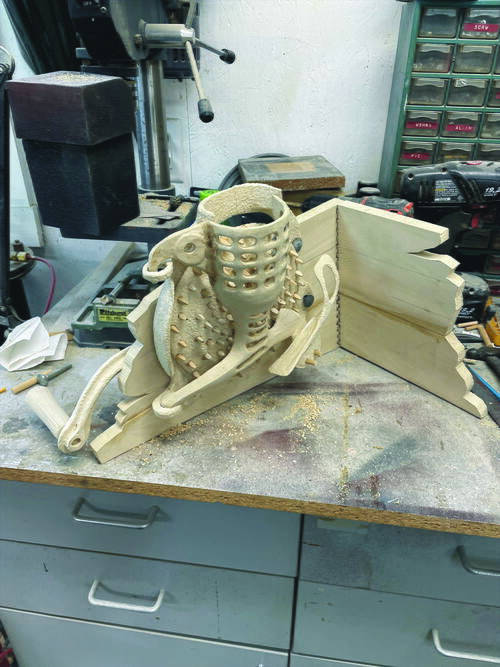
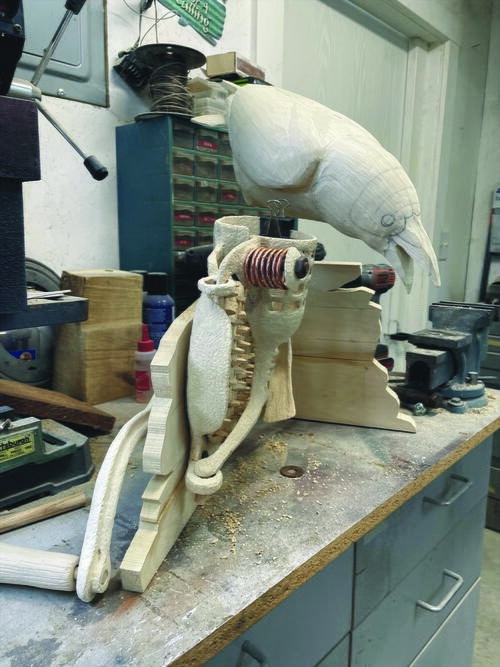
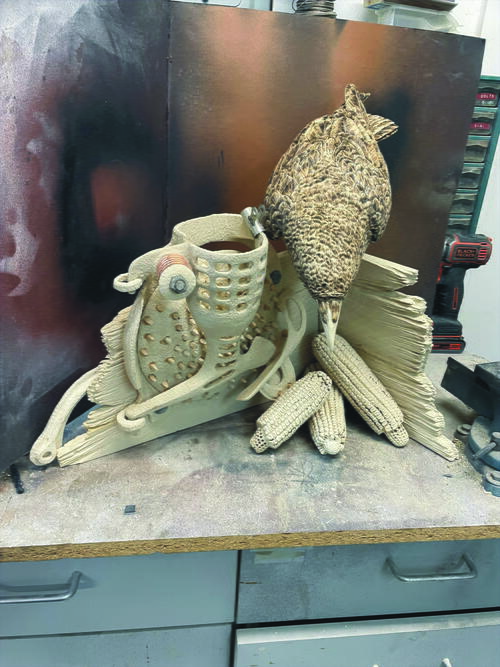
I am now able to loosely assemble the corn sheller onto the agricultural crate for a visual review.
-
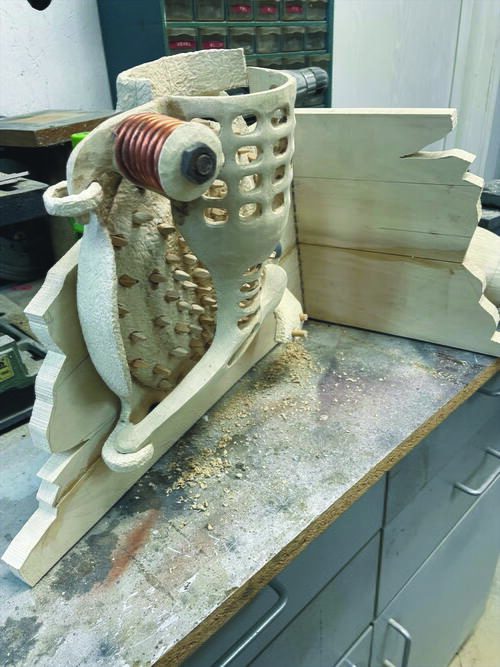
One of the criteria for this project for me was to use as much wood as possible in its creation. I wanted to keep the use of metals to an absolute minimum. Having said that, I did need to make this spring out of copper ground wire.
-
With the crate and sheller loosely completed, I can start carving out the basic shape of the crow itself. This will allow me to start thinking about how the bird will be positioned for the composition.
-
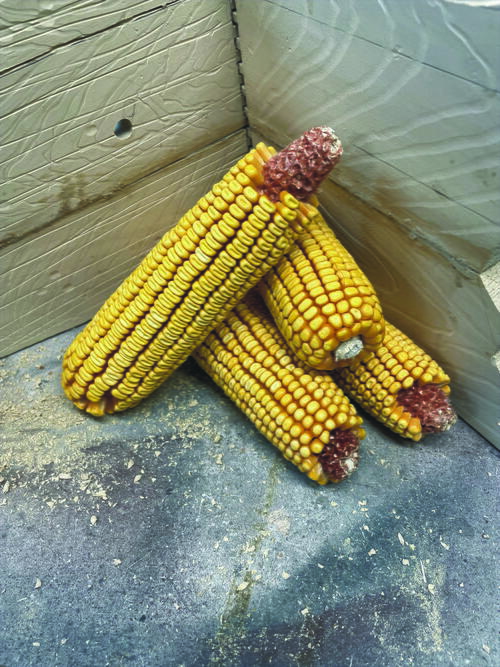
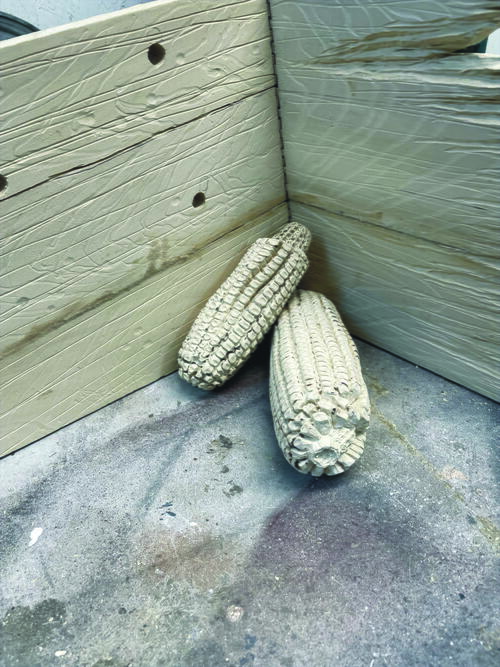
Reviewing the piece with the crow in position, I quickly discovered that the corn sheller machine may be unfamiliar to many viewers. I needed to include some kind of association with its function. I decided to add some corncobs in the inside corner of the piece. I purchased some field corn to play with the visual possibilities.
-
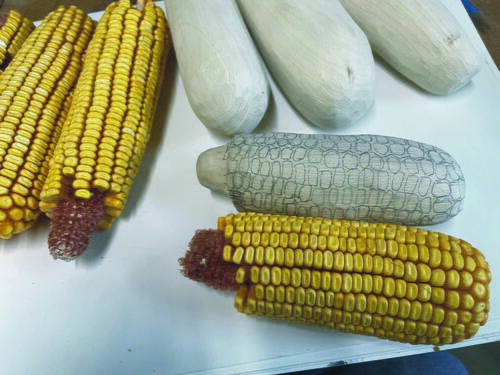
I decided on making four ears of field corn for the project. Using real corn for my models, I shaped my wooden ears for detailing.
-
With my field corn models and wooden blanks shaped and laid out, I began carving the corncobs. A small assortment of “flame”-shaped diamonds were used to carve out the corn kernels.
-
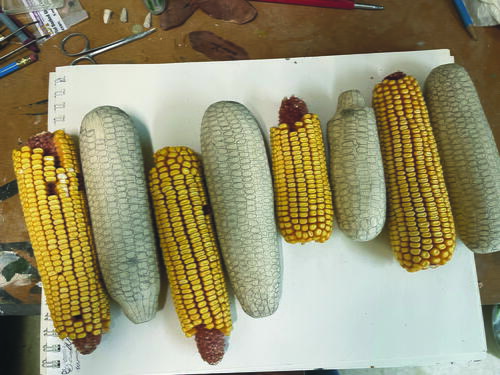
I can tell you that the most monotonous thing I have ever carved is this corncob. You keep carving and turning and carving and turning . . . After completing two of the four cobbs, I decided to do only three.
-
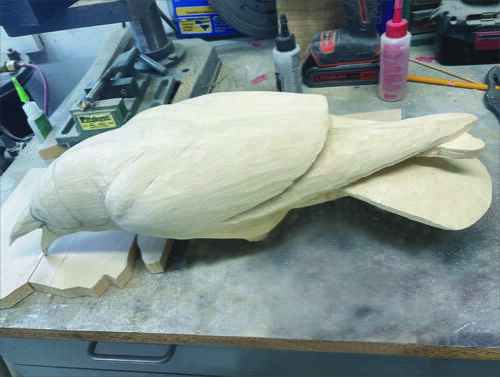
With the base for the carving figured out, it is now time to turn my attention to the crow. As with all bird carvings, I start with the basic shaping of the bird.
-
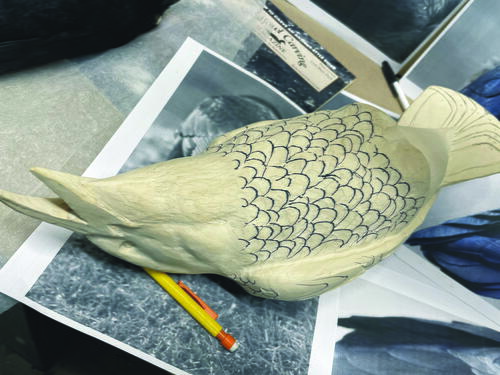
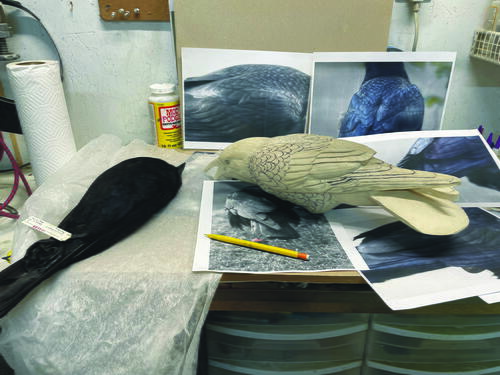
As I lay out the feather patterns on the crow, you notice that some of the layout is in a fine marker. This is not a secret process. As I get older, I can’t see as well, so the marker layout helps me keep my feathers shaped properly. The chest feathers are some of the more ruffled kinds of feathers. I plan to stone these using a diamond instead of a regular stone.
-
Because this bird is very dark, I will be carving the tertials, secondaries, greater coverts, and primaries with a little more depth than usual. I want these feather patterns to stand out once the color is applied.
-
I decided to make the beak one piece instead of two—no particular reason other than I wanted to give myself a bit more of a challenge.
-
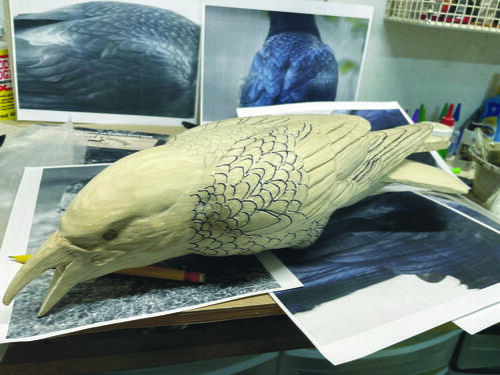
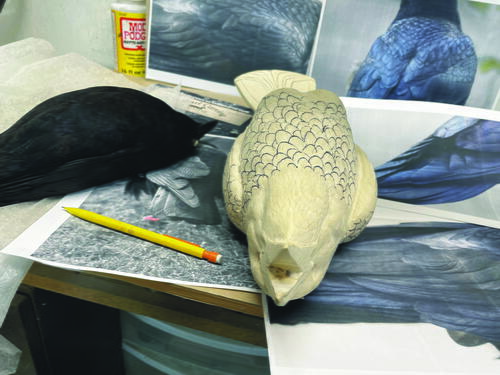
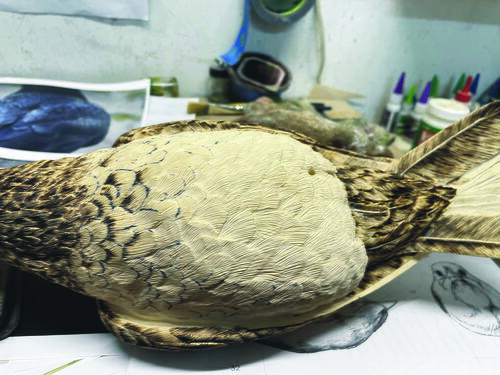
Since we all strive for accuracy, I break away from the carving process pretty frequently to review and check on my references. You see a study skin in the photo, always a valuable resource if you can acquire one.
-
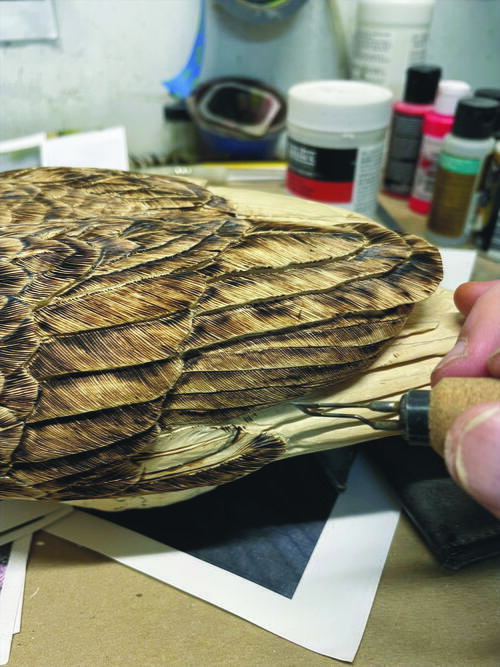
This photo shows the depth and air between each of the wing feathers. Some will tell you that this is too extreme. My response is that this is a sculptural art, and I’m creating a dark bird that relies on light and shadow whenever possible.
-
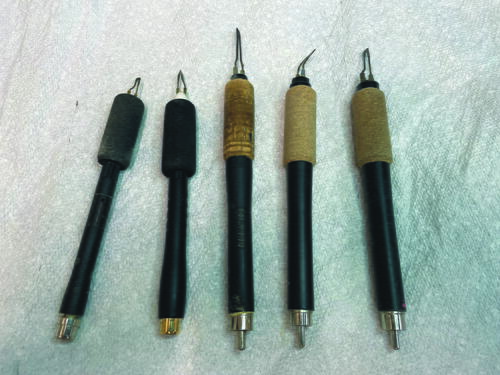
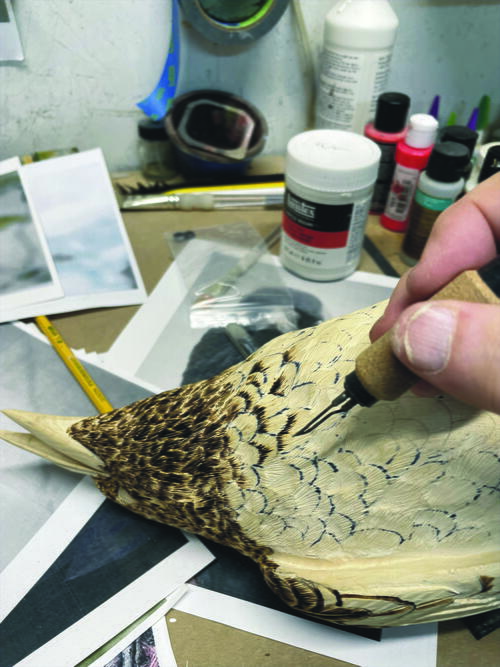
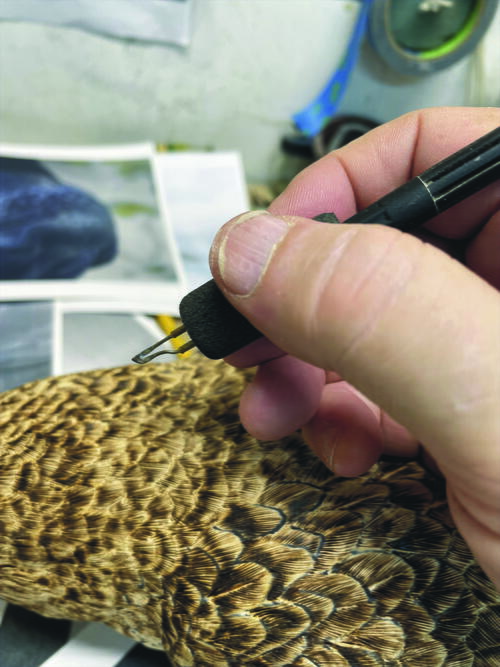
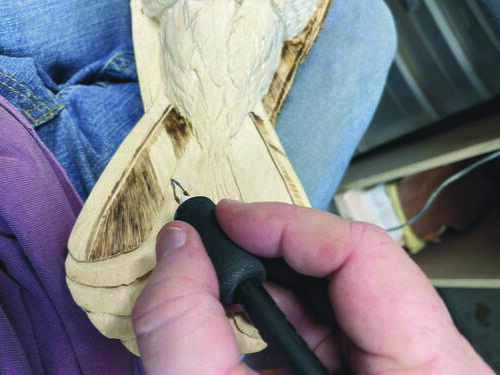
Earlier I discussed the process of texturing for color. On this crow, I used several different textures designed to enhance the iridescence of the crow. This photo shows the different burning pens used to achieve this.
-
The feathers on the throat are slightly ruffled but are fine; they were burned in a very tight formation.
-
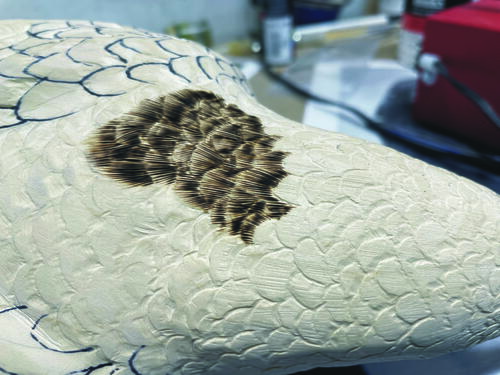
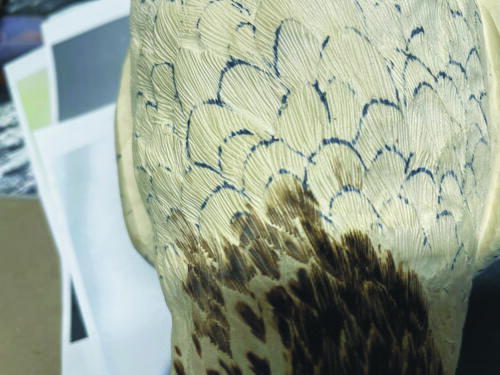
Here’s a closer look at the throat texturing and burning. The breast of the crow was mostly stoned using a diamond tip. The area where the burning and stoning meet is blended with some burning in the stone-textured area.
-
The feathers on the head are small and very smooth. I will be burning them in with a very small burning tip—one that I would typically use on small bird wings as on warblers.
-
This picture offers a closer look at both the texture and the burning pattern on the crow head.
-
The longer-tip pen is what I used to blend the burning texture with the stoned texture. The throat of the crow has some iridescent qualities that are barely seen on the breast and lower body.
-
This is the burning tip used to do the small feathers of the head and on the mantle and scapulars and secondaries
-
This photo shows the blending used from the burning pattern and the stoned texture on the body.
-
This shot of the side pocket of the crow showing the depth of the feather groups and the results of texture created from stoning with a diamond. I know this looks stark. But imagine what it will look like painted black. Light and shadow will help define this.
-
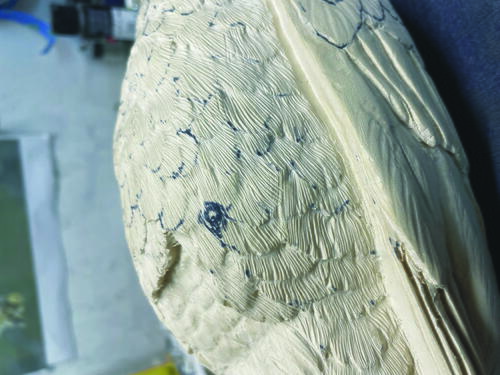
This photo shows the texture relationship between the neck, breast, tail coverts, and tail feathers—all designed to work with the coloring of these different feather sections.
-
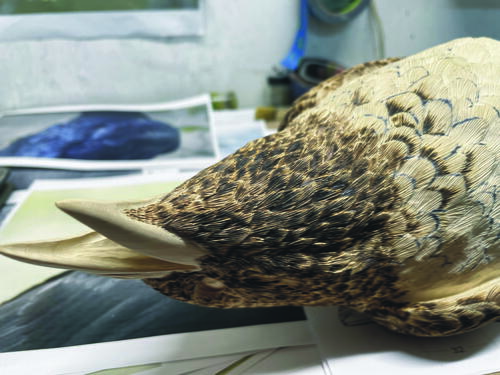
The open beak or gape of the crow was a fun part of the project. I could have carved deeper in the throat of the crow but would run the risk of mistakenly nicking the edges of the outside beak. To help create the depth I need, I will end up using a unique paint to show depth.
-
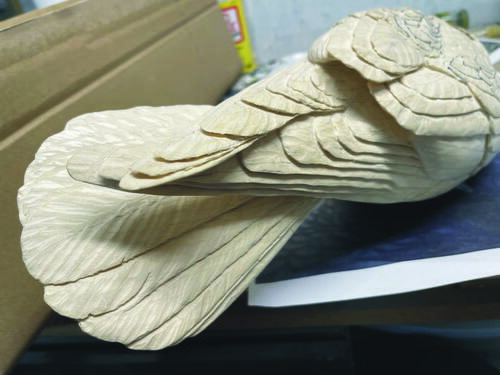
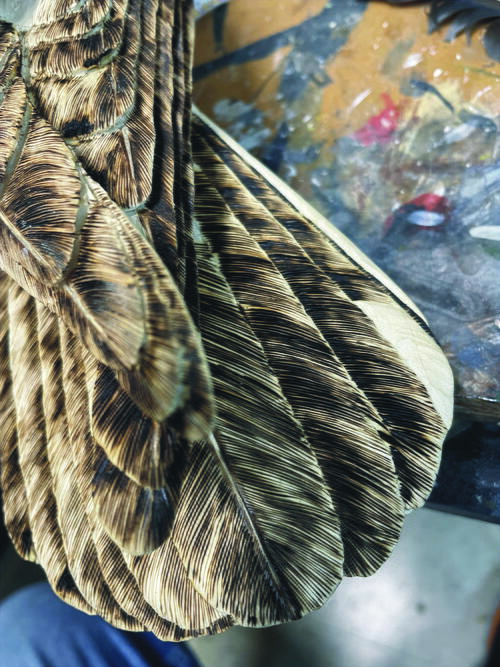
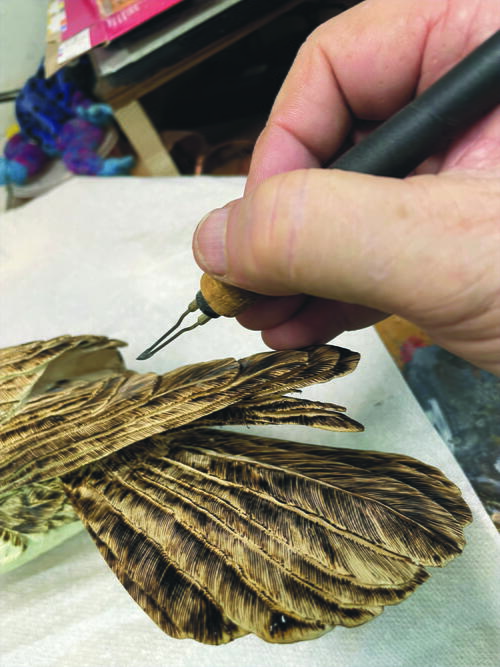
This picture shows the tight burning pattern of the wing feathers. Many of these feathers have the “wavy” effect more easily seen in the tail feathers that are not burned yet.
-
Because the wing and tail feathers do show some of the iridescent quality in coloring, you can see that a small burning tip is used with a tight pattern.
-
This photo shows the final results of the tight burning pattern for the wing and tail feathers.
-
I am using a long-tipped pen to get to the undercut areas of the carving. The majority of the greater coverts, tertials, and secondaries were burned with the small pen shown earlier.
-
The undercut of the tertials from the back requires a burning tip with a longer reach.
-
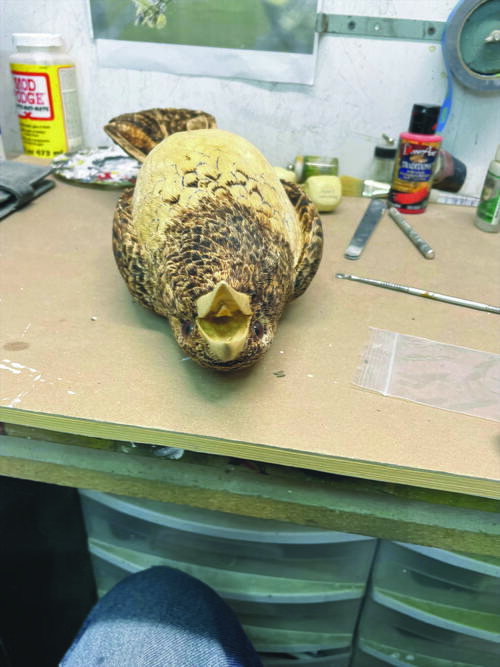
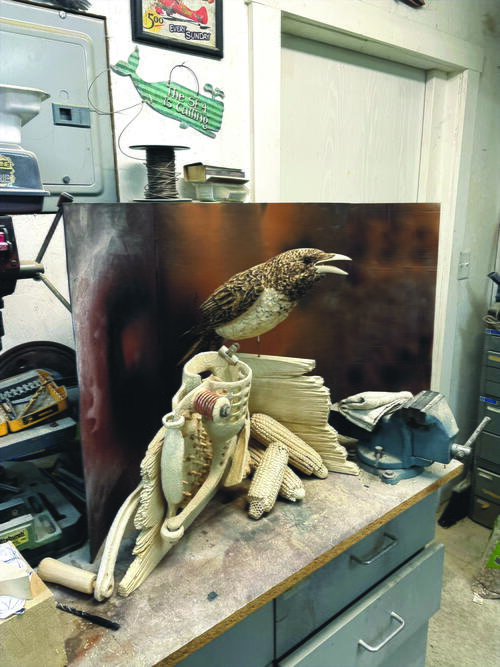
With the burning completed, I now begin to pose the crow in a variety of positions. You will recall earlier in this tutorial I had the crow leaning down. This shot shows him leaning upward. I will place the crow in several poses, taking photos of each one to eventually review in my computer to help make a decision.
-
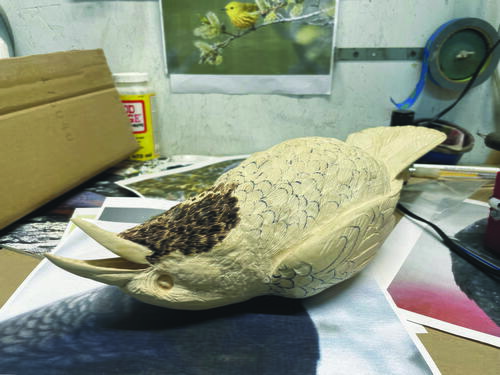
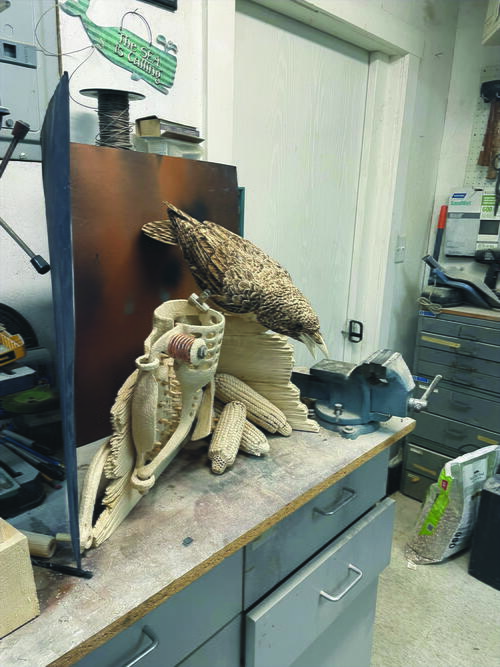
This is a shot in the down position. Which would you choose? I like the angle of this position, but it hides a lot of the neat details of the open beak.
-
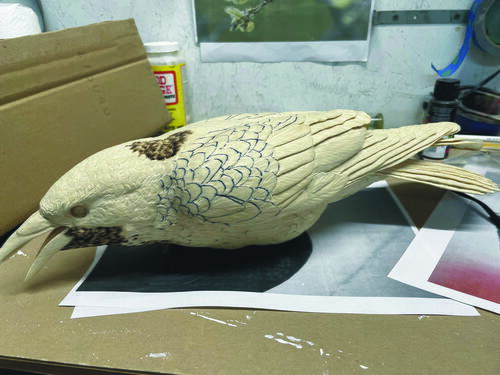
Putting the bird back in the upward position does show us his open beak, which also amplifies his attitude.
-
The same shot with the bird leaning down dramatically changes the bird’s attitude. I ended up choosing the upward position, but I really liked the downward angle, too. Decisions, decisions.
-
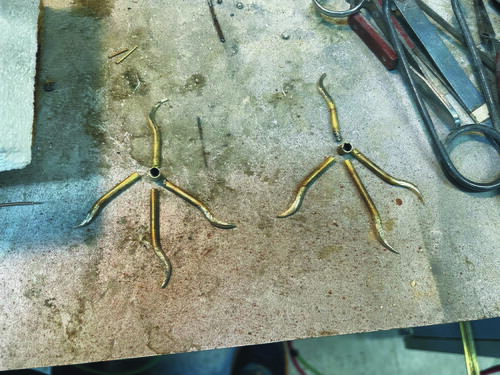
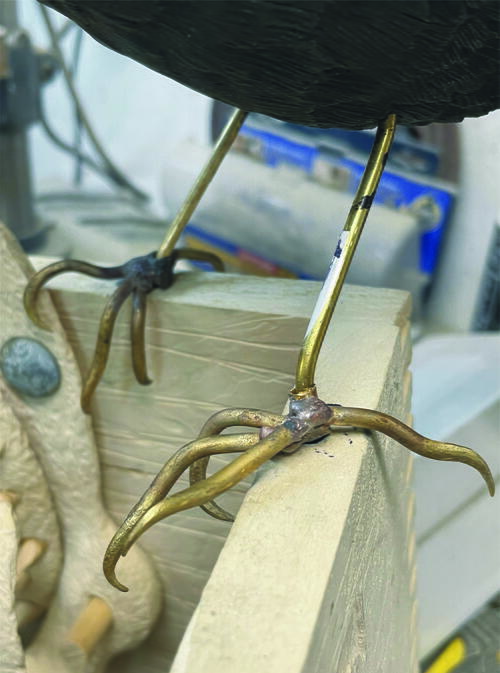
I am using bronze for the toes, but because the bird is standing on the corner of the crate, I wasn’t sure how the toes would shape out. I decided to braze the toes onto a short brass tube so I could rotate them in a convincing angle.
-
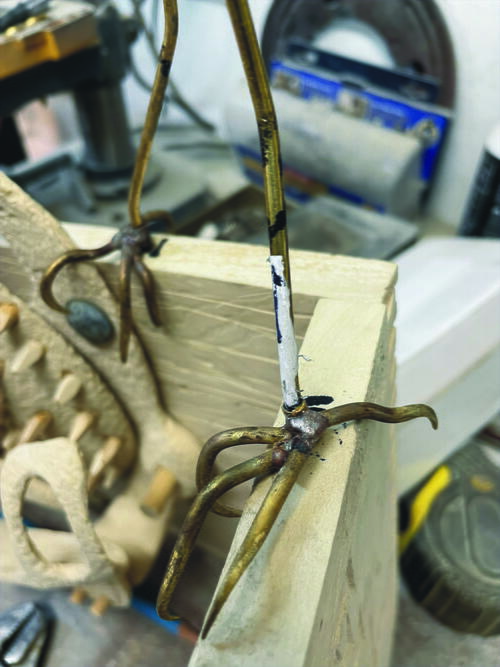
It is at this stage that I can first determine the angle by rotating the toes around the tarsus, which in turn lets me know how to bend the toes to fit the crate.
-
After deciding the bend of the toes and the angle they are pointing, I will go ahead and solder the toes at the brass tube to the tarsus. I will use the green putty to create the scaling for the feet before painting, which I will cover in the next issue. See you then!


American Crow (Approximately One-Half Life-Size)
-
By Tom Baldwin © 2023
Read NextEastern Bluebird, Part One