wildfowl-carving.com

Rose-Breasted Grosbeak Part 2

By: Bob Lavender

Bob Lavender is a retired Canadian Forces military cook residing in Saskatoon, Saskatchewan. He has been carving competitively since 1987 and has been a consistent blue-ribbon winner across North America.

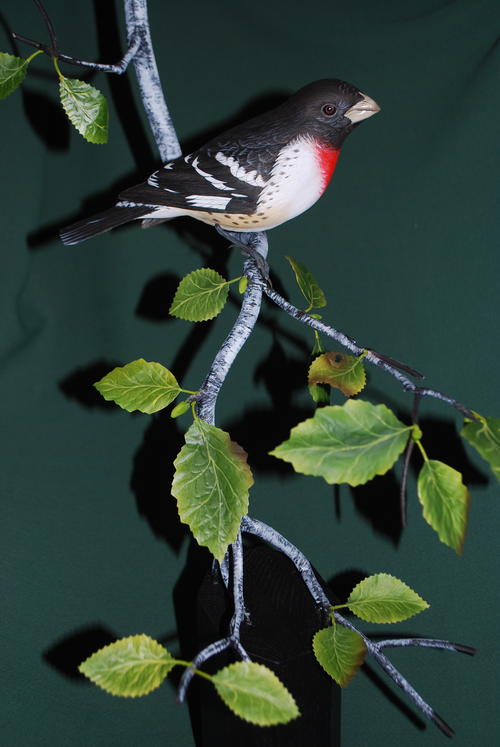
In part one from the Winter 2015 issue, I demonstrated how I carved a rose-breasted grosbeak. In this article, I will paint it. I will airbrush some of the bird and use a hand brush with washes for other areas. It’s important to use thin washes for most applications. Use my mixture percentages as guides only. You should match your colors to what you see in your reference material.

My brushes will be a mixing brush, cat’s tongue (I usually use three different sizes), and #2 and #1 rounds. My airbrush is a Harder & Steenbeck Infinity, with the psi set at 20/25. The colours are Jo Sonja titanium white, warm white, raw sienna, cadmium yellow light, naphtha red light, burnt umber, ultramarine blue, and carbon black.

Read the rest of this article in Wildfowl Carving Magazine's Spring 2015 issue.


Wildfowl Carving Demonstration

Step-by-step Instructions

For a closer look at each step, click on the image to enlarge.

  1. My painting tools are (top to bottom) the Infinity air brush, a cheap mixing brush, a cat’s tongue # 12, red sable # 2, and a very fine Scharff # 3/0. Most of the brushes I use are cheap except for the ones for fine work, such as the Scharff. I spare no expense for good brushes for fine work.

  2. I first apply warm white to the breast, throat, under-tail and upper-tail coverts, giving them three or four washes. I use Jo Sonja flow medium to mix with my paint.

  3. In these first few stages, I block in the basic colors with thin washes. That way if I make a mistake it’s not difficult to change the color. To start, I mix 90% raw sienna and 10% burnt umber with flow medium and apply this color to the lower breast or rump area.

  4. I mix 95% naphtha red light and 5% cadmium yellow light and paint the throat patch, leaving the edges with a soft transition to the white. In all these mixtures I use flow medium to thin the paint.

  5. I then apply a mixture of 60% raw sienna and 40% burnt umber to the cape, head, wings, and top of the tail. This will produce a neutral color to use under the black areas on the bird.

  6. I mix 50% burnt umber and 50% ultramarine blue and apply this to the wing feathers (flight feathers). I apply the first wash to most of the feather, leaving the edge with the base coat just applied. I dry the first color and apply the second wash, leaving more of the edge of the feather with only the first coat. As I apply these washes, I keep moving toward the quill. Using this method, I apply four washes to the centre of the feather and fewer to the sides.

  7. I next make a thin wash with a touch of carbon black added to the mixture from step #5. I apply this wash to all of the wing area, including the light feather edges. You should see these colors coming together and making the wing black in the centers of the feathers while remaining lighter at the edges. I’ll apply three or four washes, always drying each wash before applying the next one. With this method, you can make the wing as dark a value as you desire. I will use this method for all the bird’s dark areas.

  8. I do the wing covert area, using the same colour mixture and method. I leave the edge of the feathers lighter and the coverts that lay over the wing bar mostly unpainted, as they are white on the finished wing.

  9. Using washes of thin warm white, I block in the white pattern on the wing feathers. This takes time, and I don’t get concerned with
    over-painting the white. I can correct it with black later. I use titanium white to finish the white patterns.

  10. Once both wings are finished, I use the same procedure on the top of the tail. I apply two thin washes to the upper-tail covert area, just painting the first two rows of feathers.

  11. Using the mixture in step #5 with a touch of warm white, I highlight the lower edges of the tail feathers.

  12. I apply three or four washes of mixture #5 to the upper-tail covert area. Then I use warm white and paint the center of each feather with fine strokes along the barbules and texturing lines. Try not to make these look like spots.

  13. I make a template out of cover stock, which you can purchase at any office supply store. I like this material because it absorbs the paint, preventing any extra from being blown onto the surface. I use the template when I paint the cape, scapulars, and head with the air brush. I airbrush the template with the mixture from step #5, allowing the overspray to create the feather. I leave the tip of each feather lighter.

  14. With the cape finished, I continue on through the neck and head. The template I use has feathers of different sizes and shapes.

  15. Using the mixture from step #6, I apply washes until the head and cape area are the same value as the wings and tail. There is overspray on the beak, but that’s not a problem because I will paint over it later.

  16. I paint some feathers into the white breast and red throat-patch area with the cat’s tongue brush and carbon black paint. This helps soften the transition area. Then I do the same with warm white.

  17. With a mix of 50% burnt umber, 50% ultramarine blue, and a touch of warm white, I soften the edges of the cape, scapular, head, cheek patches, eyelid, and throat.

  18. I mix 85% warm white and 15% raw sienna to paint the beak. It will take three or four coats.

  19. Using a mix of 85% raw sienna and 15% carbon black, I shade along the beak line and the tip of the beak. When this is finished
    and dry, I apply several thin washes of Liquitex satin varnish.

  20. With carbon black and a fine brush, I paint some fine hair lines on the nostril and lower beak area.

  21. With the mixture from step #19, I paint the undertail and wing feathers, leaving the edges lighter.

  22. Using the mixture from step #17, I highlight the leading edges of the under wing feathers.

  23. I ​paint the white pattern on the under-tail feathers with warm white. It takes several applications to cover the darker color. I use carbon black for the splits and feather separations.

  24. I apply several thin washes of titanium white to the breast and under-tail covert area. Once again I take the mixture from step
    #5, this time to paint the line pattern on the breast area. I paint spots, and then put some fine lines through them. At this time, I will clean up by putting some splits along the breast and wing area and also around the white pattern on the wings.

  25. With the mixture from step #3 and using my cat’s tongue brush, I paint some feathers along the red patch; I do the same with warm
    white.

  26. I paint the feet with a mixture of 85% raw sienna and 15% carbon black. I then use a mixture of 90% raw sienna and 10% warm
    white to make a very thin wash and apply one coat to the feet. This should give them a scaly appearance. When the feet are dry, I apply two thin washes of Liquitex satin varnish.

  27. I glue the bird onto the branch with five-minute epoxy. I use Apoxie Clay to fill in the painting stick hole and to make the feather area where the tarsus joins the body. I paint these areas with warm white. Finally, I go over all the white pattern areas on the wings with titanium white to make them a bit brighter. Then I use carbon black to clean up any areas around the white.

YOUR RECENTLY VIEWED ARTICLES

Free tutorials, expert tips, exclusive partner offers, and more straight to your inbox!

Reviews

I have not made this yet so I cannot rate it.

Include a Photo Include a Photo

Click the button above or drag and drop images onto the button. You can upload two images.

Cancel Reply to Comment

Thanks for your comment. Don't forget to share!

Close

Report Inappropriate Comment

Are you sure you would like to report this comment? It will be flagged for our moderators to take action.

Thank you for taking the time to improve the content on our site.

Sign In to Your Account

Close Window
Sign In with one of your Social Accounts
Facebook Twitter
OR
Sign In using Email and Password