
By Any Other Name - Part I
Carving and painting a decorative smoothie long-tailed duck
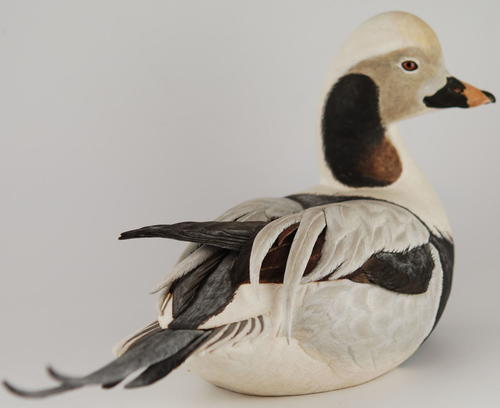
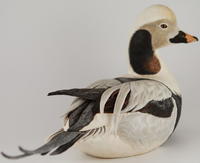
My first oldsquaw won a second in species at the 1987 Ward World Championship.
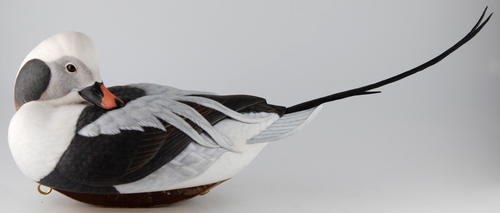
When I learned that Wildfowl Carving Magazine had never done a full demonstration of a long-tailed duck (formerly known as the oldsquaw), I jumped at the opportunity to visit an old friend. This duck was the first life-size decorative floating decoy I ever carved. It took second in species at the professional level at the Ward World Championship in 1987. When the California Open added its palm frond division, I realized the species, with its long tail, worked well with the general shape of a frond. I chose the oldsquaw for my first palm frond sculpture in 1995. Later that year, I carved an anniversary piece celebrating 10 years of carving for the 1995 North American Wildfowl Carving Championship’s hunting decoy division. For my most recent project, I wanted to do the species justice and design a piece showing a long-tailed drake performing a mating call, as it would look in the high winds on Arctic waters.
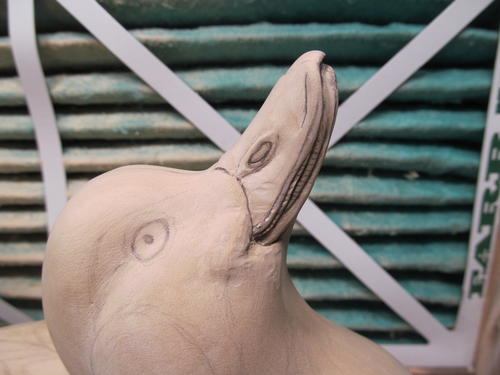
When doing my research, I noticed something I had not before: the long-tailed duck has highly devel oped alula groups. The definition of “alula” is “winglet” in Latin, and it is often referred to as a “bastard” wing, as a freely moving first digit, or as the bird’s “thumb.” All birds have alula, and generally use them for flight. However, this species uses its oversized alulae extensively while swimming and diving. You can see the long-tailed duck thrust out its alula just as the bird dives, and the ducks use them continually while foraging for food. This may explain the large size of the alula compared to those of other birds, since this species has developed a specialized use for them. I had not seen this feature on any other decoys or sculptures, so I decided to incorporate it into my design.
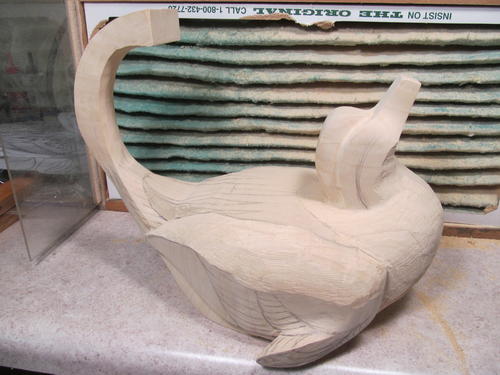
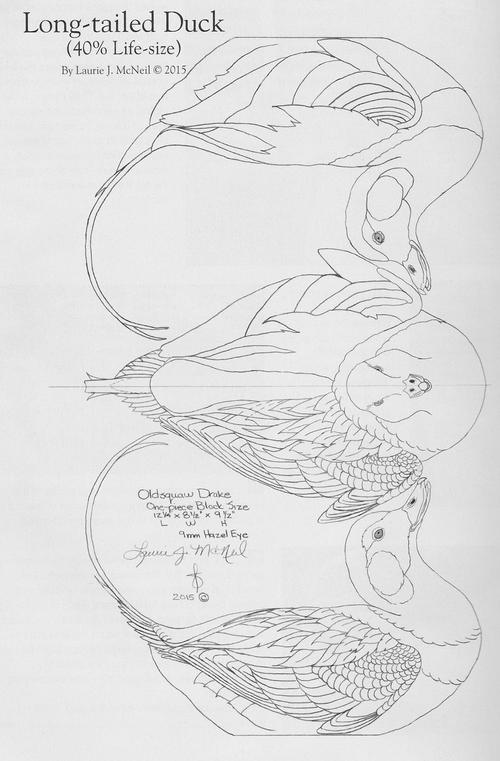
This one-piece decorative smoothie became one of my greatest challenges of my career. It required a piece of tupelo 12 inches long, 81⁄2 inches wide, and 91⁄2 inches high. Band sawing this piece was very tricky. I needed to have someone watching from the opposite side to remove pieces as they fell away. The biggest challenge in the band sawing process was cutting the tail’s thin profile through the 81⁄2-inch width of the wood. I had to really slow down and take my time, something that proved true in all aspects of this project. I had to remain constantly aware of the tail as I trained myself to work around it and to work with it.
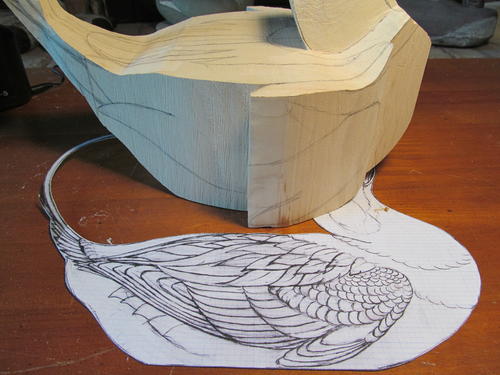
You can use the pattern provided here for a decorative life-size piece, a hunting decoy, or anything in between. One side of the profile shows the individual feather groups, and the other side shows the individual feather layout within those groups. I drew the top view the same way, with the left side showing the individual feather groups, and the right side showing the individual feathers within the groups.
Read the rest of this article in Wildfowl Carving Magazine's Winter 2016 issue.
Carving
For a closer look, please click on images below to enlarge.
What's in a Name?
For years, Clangula hyemalis was known as the oldsquaw, supposedly because its call reminded Native Americans of the sound an old woman would make. In 2000, the American Ornithologists’ Union Committee on Classification and Nomenclature announced that it was changing the species’ name to the long-tailed duck. The word “squaw” had fallen out of favor as being potentially offensive, but the committee denied that was the only reason for the switch. It said, “The Committee declines to consider political correctness alone in changing long-standing English names of birds but is willing in this instance to adopt an alternative name that is in use in much of the world.”
To see how to paint the duck, click here.
-
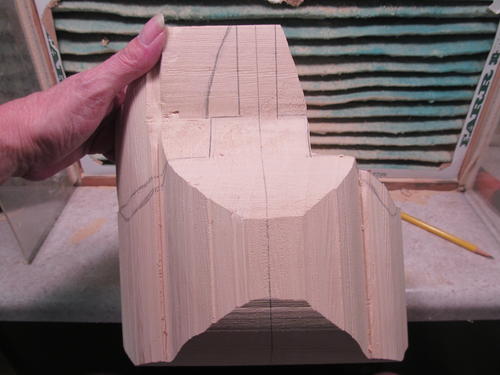
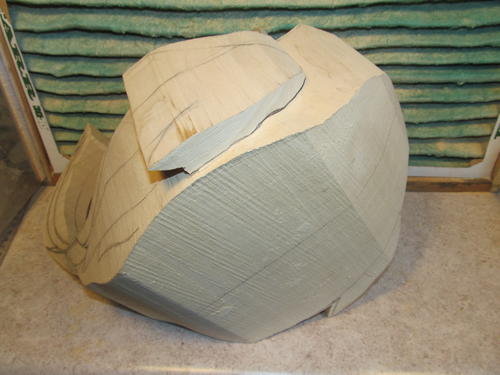
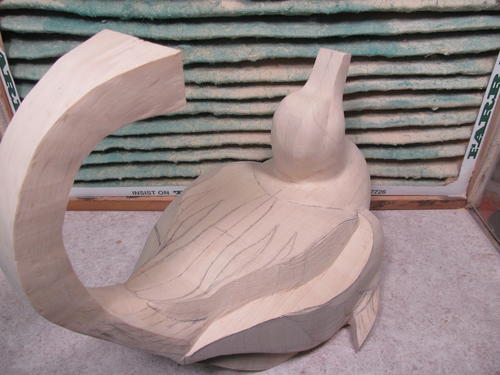
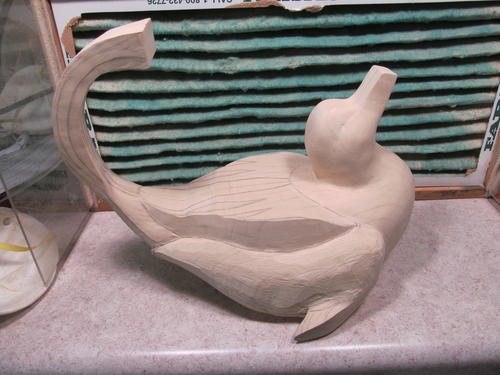
This is the duck fresh from the band saw, with the side-view template in the forefront and the clay model in the background. After creating the clay model to develop my pattern, I traced around the pattern templates (top and side view) to transfer the outside lines to my block of tupelo. I kept the outline for the tail on both the top and side views considerably thicker than the pattern as a safety measure, providing strength in the tail for the duration of the carving process. The tail will be the last area I carve. My next step will be to place the reference lines, using the templates.
-
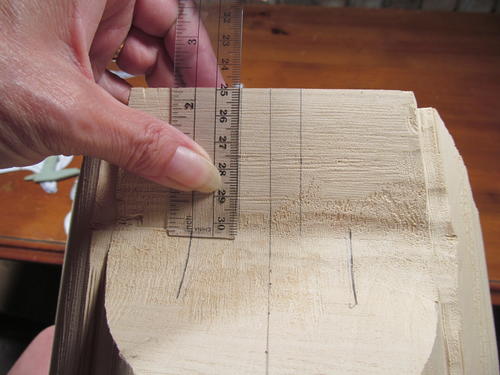
I use the top-view template to draw the center line around the entire piece. I used a pin to poke holes along the center line of the template. The holes are big enough for me to fit a pencil tip through them. Using a flexible ruler, I connect the reference points and complete the center line. Then I flip the top-view template over, place it on the bottom (aligned with the outer edges), and transfer the center line to bottom of the piece. In the end, you should have a straight line around the entire bird. Do not expect to get your center line perfect the first time. Typically, I have to make some adjustments before I am satisfied.
-
From the template, measure the width of the bill and the head, and then transfer the outer lines and draw them in using a flexible ruler. The flexible ruler is indispensable to me, because it conforms to the shape of the cutout, allowing me to draw accurate straight lines onto contoured surfaces.
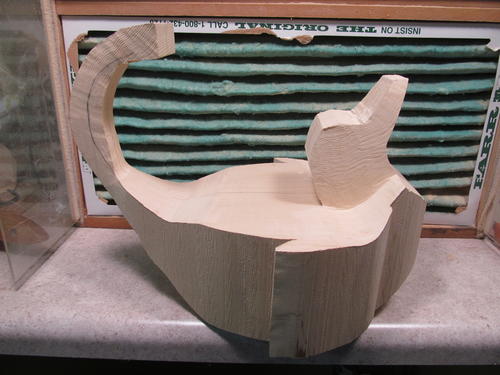
The roughing out process requires the use of bits that take wood off very quickly. Because this is a one-piece carving, there will be no room for error. I feel most comfortable leaving a little extra wood (1⁄8" x 1⁄16") beyond the pencil lines, in critical areas such as the bill. This is a safety measure, important for beginners as well as experts. -
I’ve drawn in the width of the tail’s tip, and will keep the long central tail feathers wide and thick right up to the end of the carving process. I will use a flex shaft grinder and a Karbide Kutzall (1⁄2" x 2" cylinder) for the majority of the roughing-out process. The straight long sides of the bit allow me to remove wood at 90- degree angles very quickly.
-
In this view, looking forward from behind the tail, you can see how I’ve removed the excess wood from the right side of the central tail feathers, leaving the pencil lines as reference. It is important to leave your pencil lines when you are roughing out. You have spent a lot of time placing them correctly from the template. When you carve away a line, you lose your point of reference and are entering dangerous territory. This doesn’t mean lines will never be removed, but when they are, replace them so you can stay on track.
-
The Karbide Kutzall quickly removes the excess wood on the side of the head, down to the lower edge of the neck line where it meets the body.
-
As I bring the sides of the head and neck down to their widest points, I maintain a 90-degree angle.
-
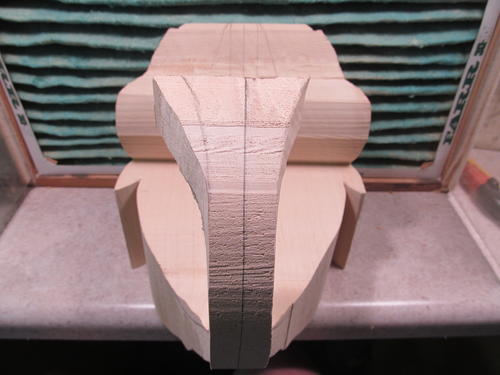
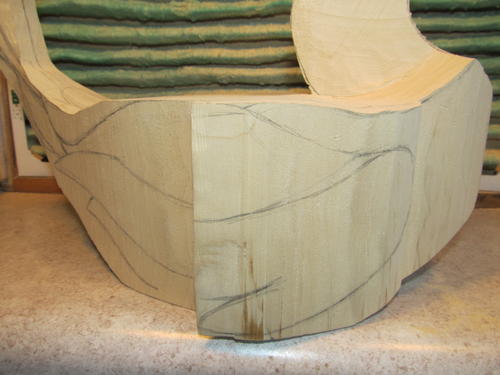
Now that the excess wood has been removed from both sides of the head, I can draw in the feather groups for both the top and side views.
-
Using the top-view template and a pin, I mark the outer edges of the feather groups. Then I draw the scapular feathers. The side view provides the same reference points, defining the outer edges of the wing, scapular, cape, and tail.
-
Placing the side-view template on the flat side of the head, I trace it to define the head’s outer edge. Then I place the eyes, checking for symmetry from side to side and top to bottom. I’ve drawn in the width of the neck (from the front view), and carved it up to the pencil line on the right side of the neck. I will do the same on the left side, to further define the top area of the breast, where it meets the neck.
-
Here you can see how I’ve drawn in the cape, scapular, and the wing-group reference lines. I will use the flex-shaft grinder with the Karbide Kutzall cylinder to remove the excess wood at 90-degree angles.
-
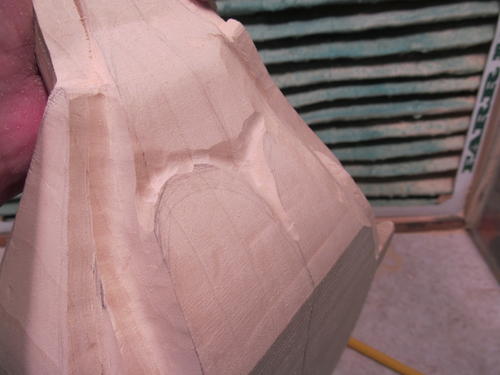
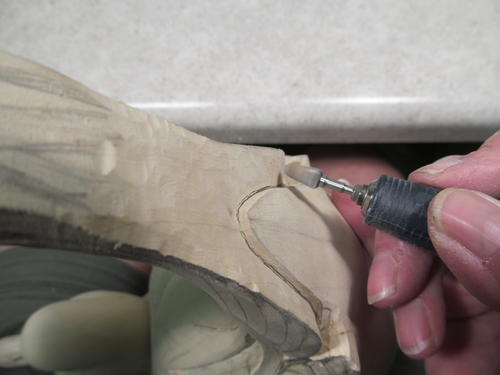
Cut the excess wood below the pencil line, defining the lower edge of the alula, and forward to the front of the wing, as deep as the width of the body.
-
Still cutting at a 90-degree angle, I’ve carved down the major portion of the wing to define the projecting alula. The same is true with the cape, down to top edge of the wing, and the scapular group, behind the top of the head.
-
Following the pencil line defining the top of the wing—which includes the top side of the primaries, secondaries, and tertials—I use the Karbide Kutzall cylinder to cut a 90-degree angle up to the scapular group and upper-tail coverts.
-
I make one of the last of the 90-degree cuts to the head, taking the sides down to the pencil lines, and defining the widest points of the bill and cheek areas.
-
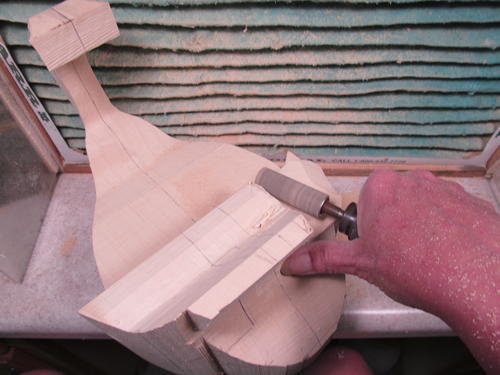
At this point, I could have trusted the pattern and cut the outer edge of the scapular group straight down at a 90-degree angle to the pencil line I drew on the side of the wing, defining the lower edge of the scapular feathers. This seemed too radical to me at the time, and I did not want to make a mistake. Instead, I switched to a cone-shaped Karbide Kutzall and rounded the wing between the top-view outer scapular group lines, and the side-view lower edge of the scapular group.
-
I round the hard edges of the neck and breast to the center line, the cape area down to the wing, and the scapular groups. I add a pencil line indicating the widest point on the sides of the head. I will round the cheeks to this point.
-
The rounding continues. I round the top and back of the head, neck, and breast to the center line, and the cheeks to the pencil line where they are widest. I leave the bill at 90-degree angles, to be carved later. Leaving the sides of the bill flat will make it easier to place and trace around the template when it is time. The next step is to cut the scapular groups into the rounded wing with the Karbide Kutzall cylinder. I cut down the outer edge of the scapular group to where they stop (bottom edge) on the wing, when viewed from the side. This was a radical cut, but the pattern did not lie. I could have done this step before I rounded the wings.
-
At this point I switch over to the Gesswein Power Hand 3 and the large, bud-shaped carbide crosscutter. The carbide crosscutter removes a lot of wood very quickly and effortlessly. It also is great for smoothing rough surfaces and scars left by the Karbide Kutzall cone and cylinder.
-
I use the carbide crosscutter to cut in the lower edge of the wings and define the back of the side pockets.
-
I use the carbide crosscutter to cut in the lower edge of the wings and define the back of the side pockets.
-
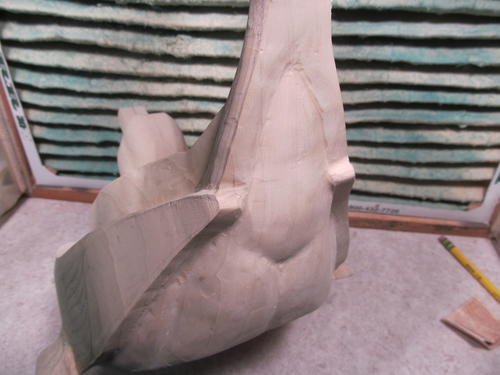
Here are the rump and lower-tail coverts after rounding and sanding.
-
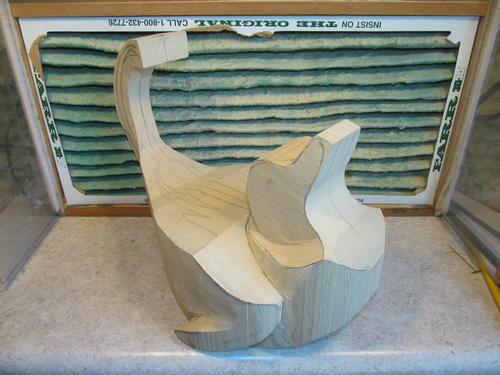
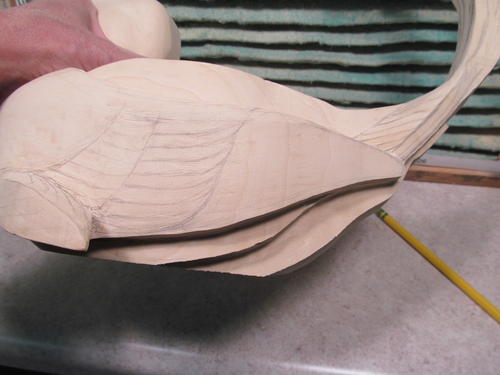
I have rounded the wings down from the bottom edge of the scapular feathers to the lower edge of the wing and the alula. The tail has been thinned down to approximately ½" thickness, exposing the area where the primary wing feathers will fit under the sides of the tail.
-
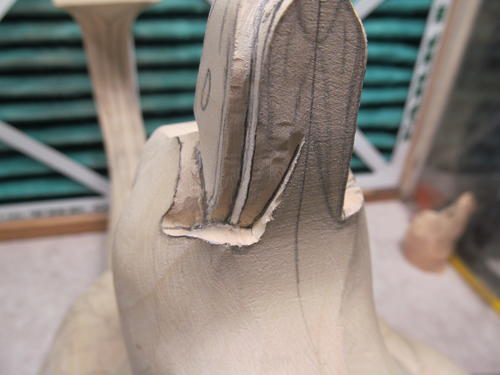
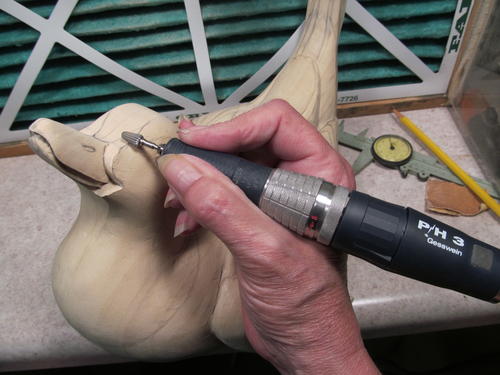
Using a 3⁄32" small diamond flame, I separate the upper and lower mandibles at a 90-degree angle. I take down the upper mandible to its correct width where it meets the feathers, defining the back edge. I also take the lower mandible down to width, and draw in the bill detail according to measurements taken from my study bill. It is important to have a study bill to determine the width and length of certain areas. I use a dial caliper to measure the width of the back of the nostril holes, and transfer the measurements to the carving.
-
I use the pattern to draw and redraw the detail of the bill continually as I remove wood. It is important each time to check that both nostril holes are evenly placed, from top to bottom and side to side. The template comes in handy for this. You can use it to place pin holes at the top and bottom edges of the middle of the nostril hole, and at the front and back. Simply align the template and mark them again to easily redraw the detail. I round the hard edges of the upper mandible with the carbide crosscutter, and then sand smooth the upper and lower mandibles.
-
This is another radical cut, made to remove the excess wood at the nostrils.
-
I have now cut in the nostril holes to the correct width, and then carved out and rounded the lower edge of the nostril ridge, down to the bottom edge of the upper mandible. I redraw the pencil lines of the bill details each time I carve them away.
-
Switching over to a 1⁄16" (friction grip) diamond flame, I carve in the detail of the lower mandible.
-
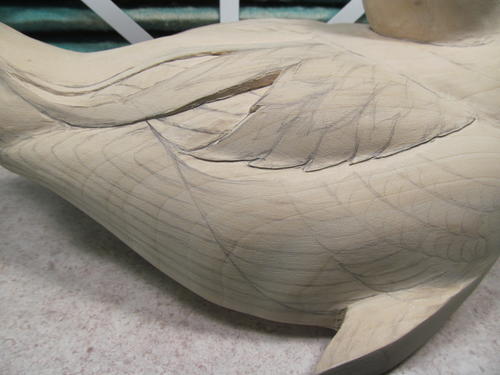
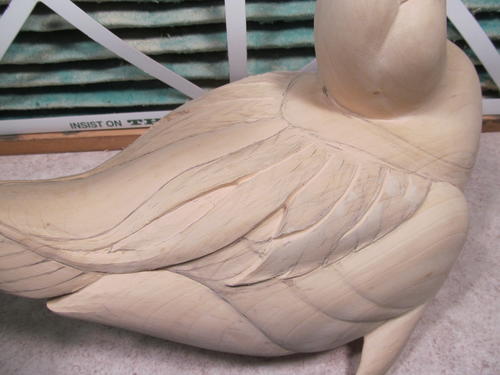
Now I’ve defined the outer edges of the feathers in the scapular group and removed the excess wood between them, down to the level of the wing, which lies beneath the scapular group. Sanding the surfaces smooth makes it much easier for me to sketch the feather layout of the scapular group and wing. The next step is to define the major wing groups.
-
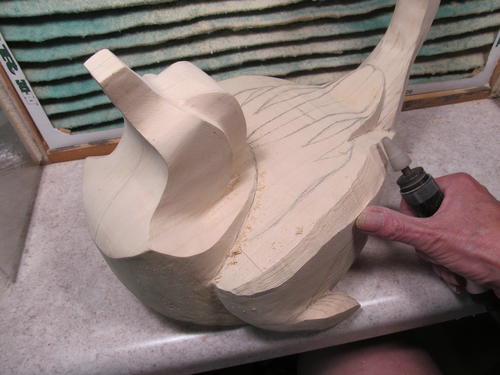
I’ve rounded the hard edge of the alula. I had left this area large and thick for safety reasons. After sanding these areas smooth, I redraw the feather details. Using the carbide crosscutter, I remove the excess wood at the front of the wing and below the alula.
-
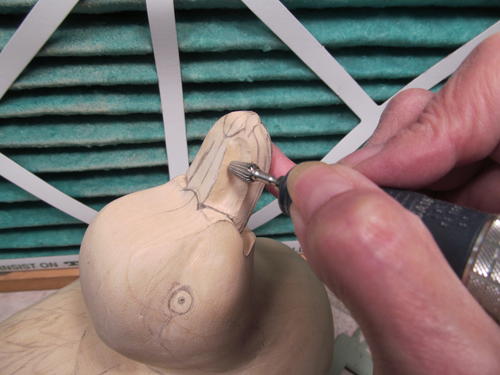
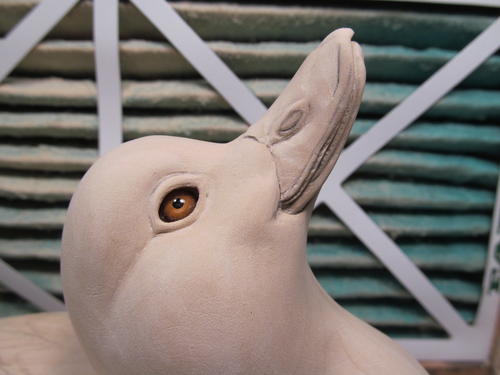
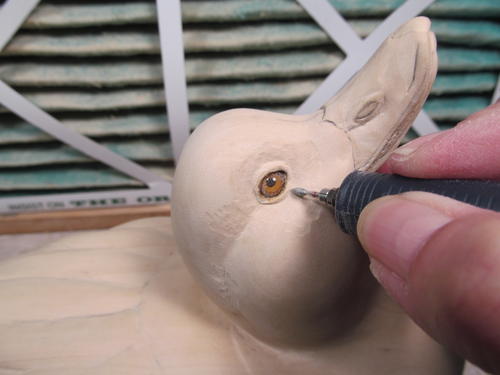
After carving the eye openings, but before I’ve custom fitted the eyes, I carve the area around the eyes to include the white feather ring, and to bring the distance between the eyes down to actual width. Then I sand the eye rings and custom fit the glass eyes. I won’t permanently set them until after I’ve carved the tail. Until then, the eyes can be removed.
-
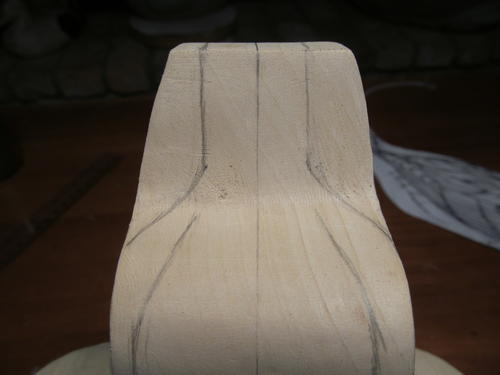
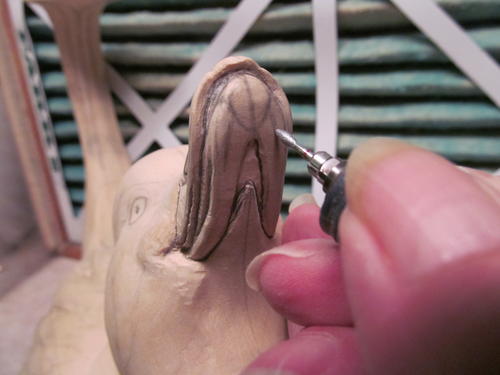
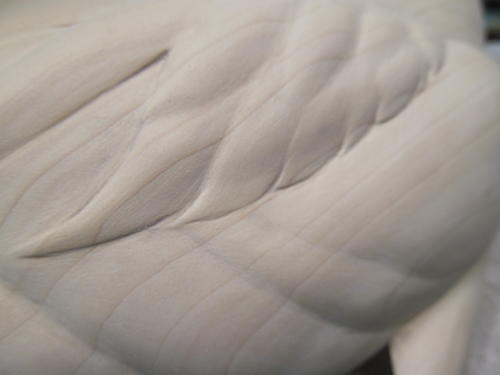
I will not carve the individual feathers of the scapular group. However, I will indicate the flow of the feather tracts with subtle undulations. I draw one pencil line between feather tracts, showing where I will remove wood. Another indicates the tract’s high point.
-
The quills of the long scapular feathers, stiffer than the feather barbs attached to them, can give a loft and a rounded appearance to the feathers along these tracts. Using the 3⁄32" small diamond flame, I carve a line of varying depth (from 1⁄16" at the top to 1⁄8" toward the end of the feather tracts). I will round down each feather tract, from the pencil line indicating the high point and center of the feather tract, to the depth of the lines carved in between the feather tracts.
-
A lot of sanding leaves the feather tracts subtly indicated, as the scapular feather group flows out and onto the wing. Sanding the wing groups to a subtle definition will help in the painting process.
-
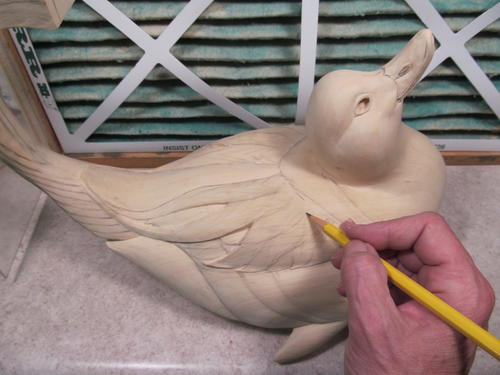
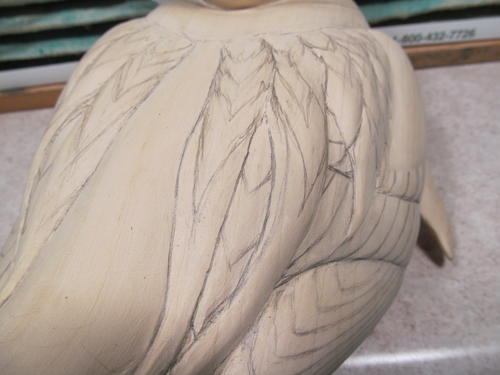
I won’t carve the individual feathers, but I will paint them. To make sure the feather layout works with the feather tracts, I draw the individual feathers. This allows me to adjust the width and height of the feather tracts according to the individual feathers. Even at this point, I am already thinking about painting.
-
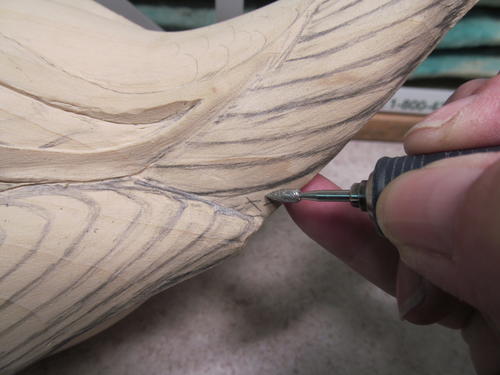
Using a 3⁄32" small diamond flame, I cut in the upper edge of the primary wing feathers and the lower edge of the tail.
-
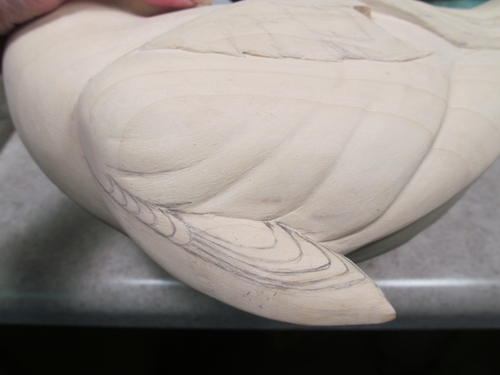
Now that I’ve defined the lower edge of the tail, I can finalize the lower-tail coverts and thin the tail.
-
I carve the lower-tail coverts deeper with the carbide crosscutter, and then round them to the center line.
-
Now I permanently set the eyes and finalize the eye ring with the 1⁄16" (friction grip) diamond flame.
-
It’s time to finalize the subtle shapes of the head and neck and carve in the detail of the lower mandible. I use the carbide cross cutter to shape the head and areas around the bill, and the 1⁄16" (friction grip) diamond flame on the bill detail. I’ll complete the final carving of the bill details (the nails, nostrils, etc.) with sandpaper. It is amazing how much detail you can carve with the folded corner of a tiny piece of 3M 150- or 220-grit Garnet paper. Plus, it is safer.
-
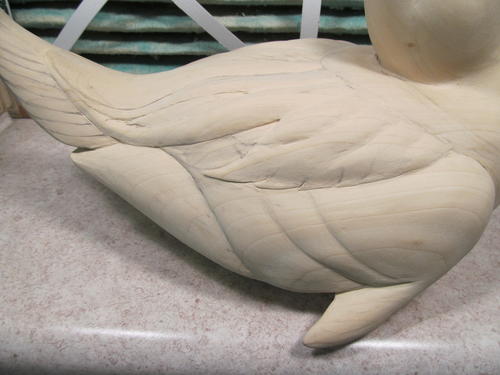
Generally speaking, a decorative smoothie has no individual feathers carved, only feather groups. In this piece, I’ve carved only the outer edge of the scapular group, with the subtle undulations of the feather tracts within the group. These lumps and bumps will lend to a realistic look without carved individual feathers.
-
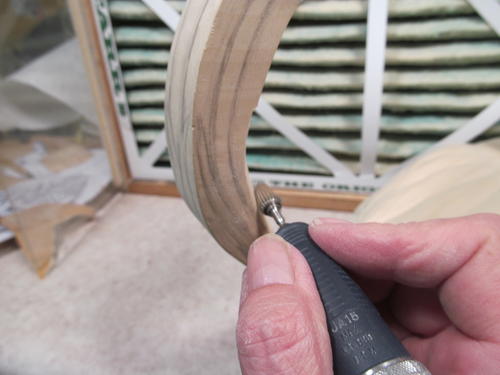
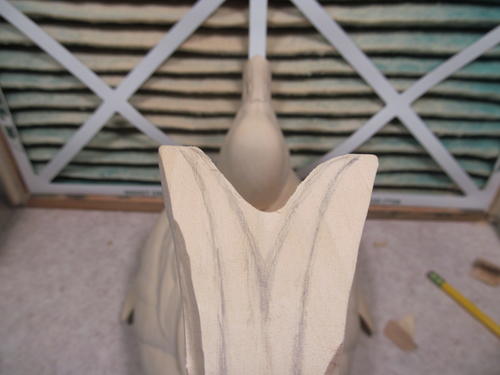
I did my final sanding and signed the piece before I begin to thin the long, curved central tail feathers. I use the carbide crosscutter for the majority of the thinning, beginning where the long central tail feathers emerge from the rest of the tail. They remain quite strong as I approach the middle area of the tail. I stop here and turn my attention to the tips of the tail feathers. I do not want to apply any more pressure than necessary on the tail’s more vulnerable midsection.
-
Working slowly and carefully, I remove the excess wood from both sides with the carbide crosscutter, while using my left hand to apply counter pressure on the opposite side for support. The biggest trick to carving this part of the tail is to do it slowly.
-
Once I am happy with width and profile of the central tail feathers, I carve up the center of the underside, allowing me to thin them even further.
-
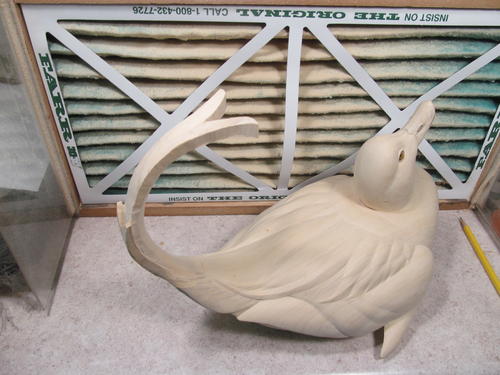
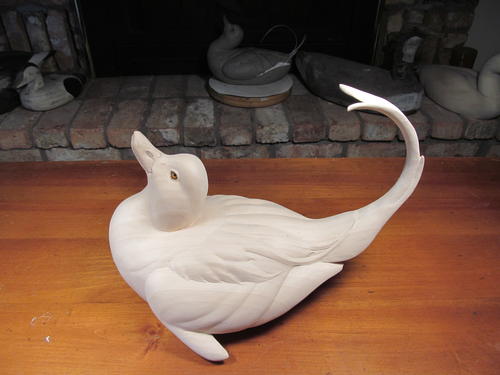
In the end, it took me three sittings to completely carve down and thin the central tail feathers. They sanded up very smoothly and remain quite strong, despite being carved from a single piece of tupelo. The hours I spent sanding the rest of the bird left a beautiful surface for painting. It is well worth the time it takes to achieve a pristine surface, because you won’t be trying to cover up scratches and dings left behind. Eliminating these distractions will make the painting much easier.


Other Works by Laurie J. McNeil
You can follow Laurie J. McNeil and her teachings through her Facebook Page, http://Facebook.com/TheArtistryStudios. Offering private and group instruction, Laurie is available for speaking engagements and demonstration workshops across the USA and abroad. Contact Laurie for more information and to schedule your event, or to order a commission piece, by e-mailing Laurie@TheArtistry.com.
-
In 1995 I carved a palm frond oldsquaw for the California Open.
-
I carved another oldsquaw in 1995 for the North American Wildfowl Carving Championship.
-
This year I'm tackling another version of the species, now known as the long-tailed duck.
-
Long-Tailed Duck Pattern


Share This Article
YOUR RECENTLY VIEWED ARTICLES
Free tutorials, expert tips, exclusive partner offers, and more straight to your inbox!
Thanks for your comment. Don't forget to share!
jcdonahue52 720076 9
Jun 16, 2020
I just finished carving one and used your paint suggestions. I did the tail out of bamboo and built a mold to bend it for a week prior to sealing it and attaching it. Had a hard time deciding on which plumage to choose.
Report Inappropriate Comment
Are you sure you would like to report this comment? It will be flagged for our moderators to take action.
Thank you for taking the time to improve the content on our site.
